Guide to Authentication in Filestash
This is guide 2 of 3 covering the triptych: storage, authentication, and authorisation, which together form the basis of a good file management platform where you stay in control of “who can do what and where”. This episode covers authentication, aka the “who” part. Once you know “who” the user is, you can configure the rest: storage defines the “where”, and authorisation is the “can do what” that sits between the two.
What is authentication about?
Filestash is built around one core principle: “anything that’s not a fundamental truth of the universe lives in a plugin”. Authentication is the textbook example of why. Few topics raise stronger opinions, and every camp has its blind spots: people swearing by OpenID rarely mention that it assumes your server can reach the IDP over the network, which is not a given if you ever touch airgapped deployments. Like most things in engineering, it comes down to trade-offs.
So rather than picking a side, we integrate with every provider in every way we can. Authentication plugins work much like our storage drivers: each one implements a core interface that’s flexible enough to handle any use case.
In practice, that gives you plugins covering: htpasswd, local users with a GUI, proxy headers, URL parameters, LDAP, OpenID, SAML, SQL, WordPress, any HTTP endpoint, phone numbers, a merge plugin to combine several of them into a single login flow, and more.
That’s a lot to choose from, but if you take a step back, 2 patterns emerge, which are the topic of the next 2 sections:
- the passthrough pattern
- the facade pattern
Option 1 of 2: The Passthrough Pattern
It is the right choice for you if:
you prefer the authentication to be handled by the storage layer, meaning the authentication details are passed directly to the storage.
What does that look like in practice?
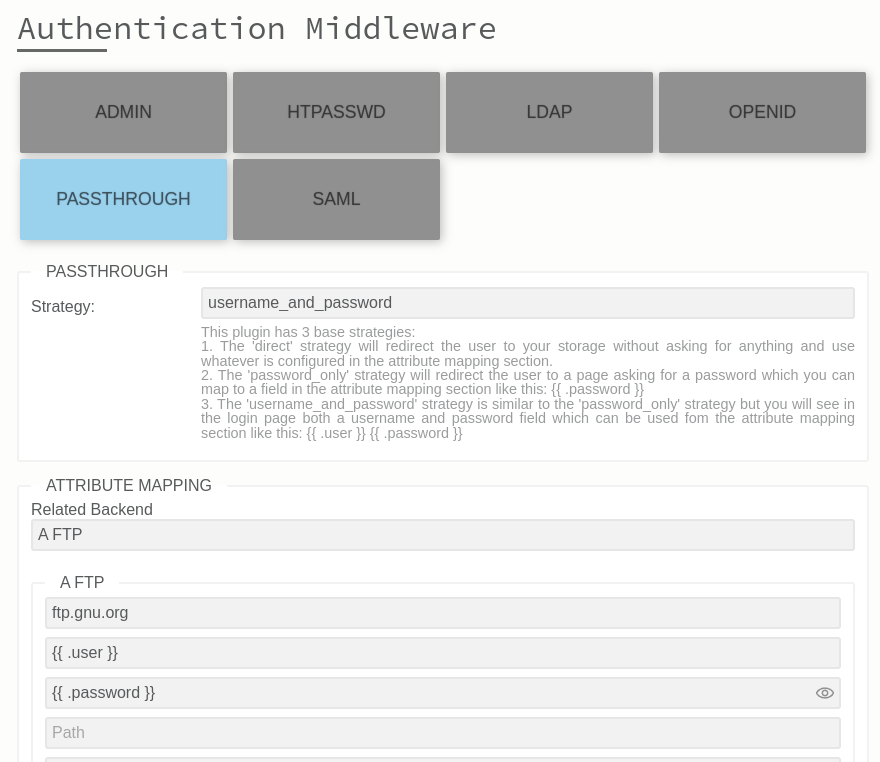
Using this configuration, users will see a much simpler login page:
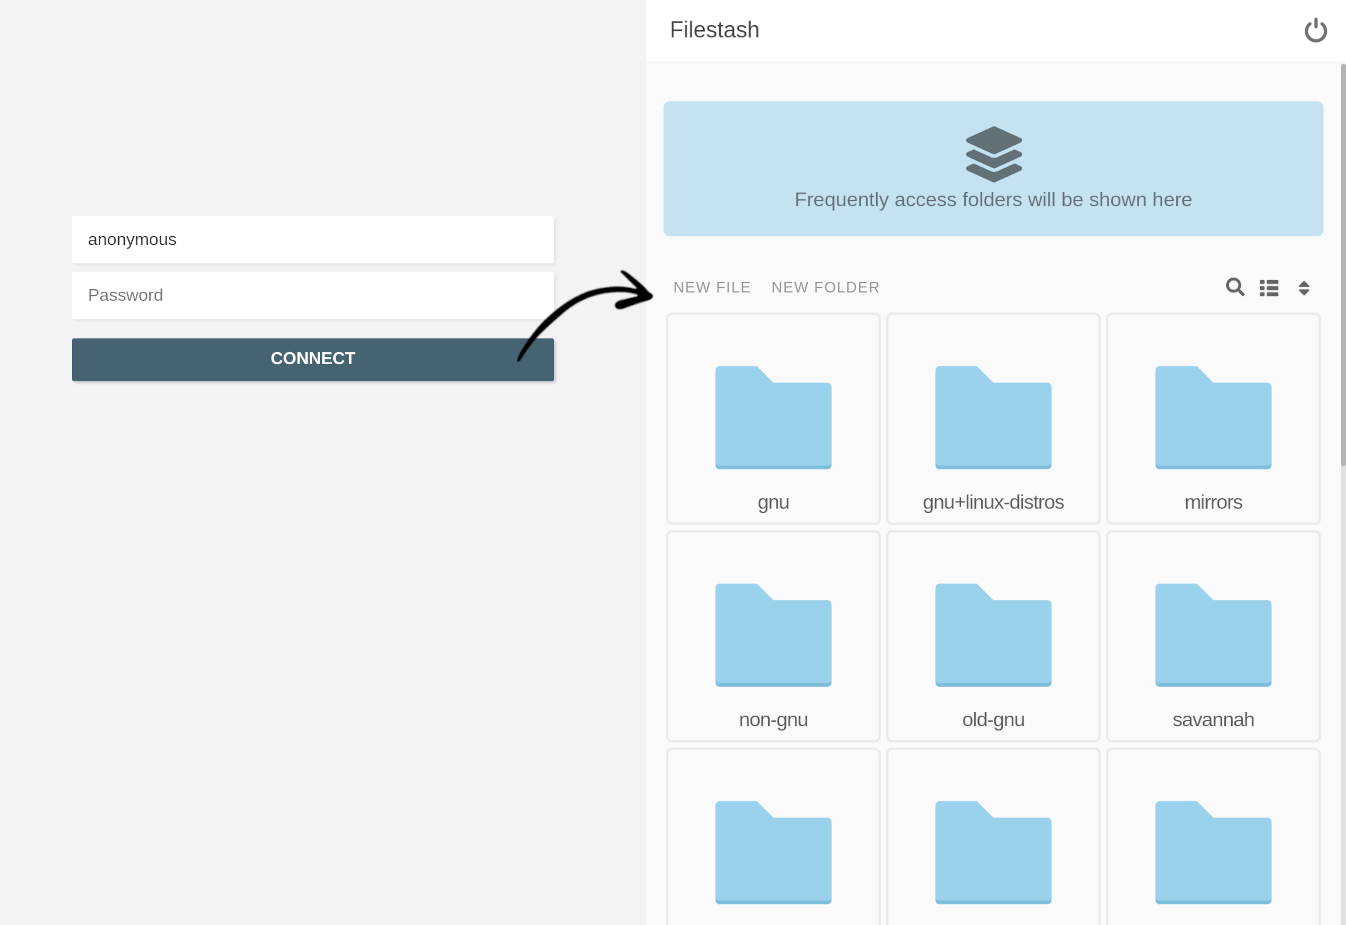
At this point, the user experience is much improved over our starting point, as users no longer need to remember details like the “hostname” and “port”. The connection combines static values, like the hardcoded “ftp.gnu.org” hostname from the admin configuration, with dynamic variables such as the “username” and “password” provided by the user.
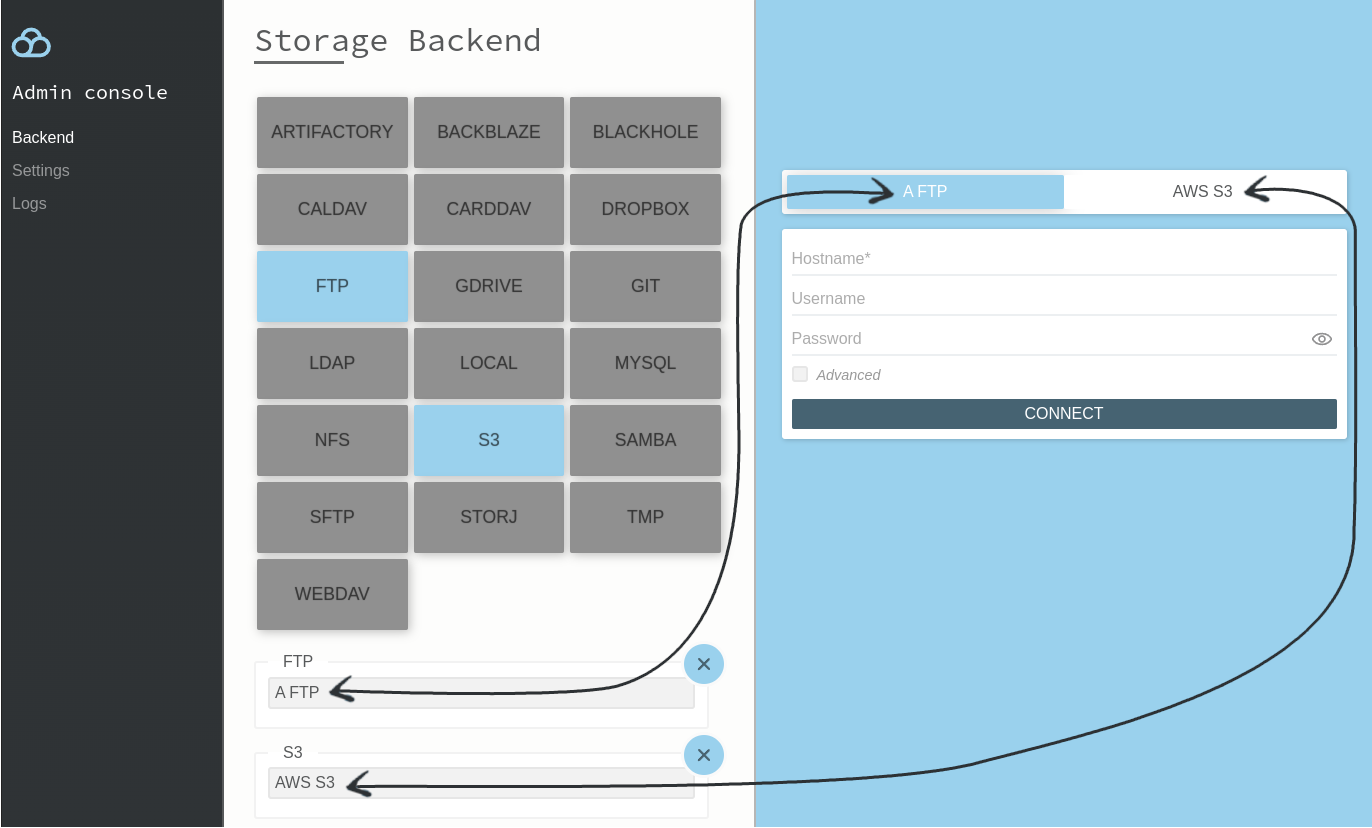
Another common strategy is to create automatic login links. To set this up, simply change the strategy in the configuration to “direct” and configure everything statically.
Filestash has 3 plugins that support the passthrough pattern:
- the “Passthrough” middleware plugin, showcased in this section
- the “URL” middleware plugin*, which exposes URL parameters as dynamic variables in the configuration, and supports signed URLs as an option. It’s ideal for generating secure deep links and QR codes.
- the “Proxy” middleware plugin*, for when you have a proxy sitting in between and forwarding headers like
X-Remote-UserorX-Remote-Group.
Option 2 of 2: The Facade Pattern
It is the right choice for you if:
You prefer users to authenticate through a separate system, with options to grant various types of access based on their identity.
This approach creates a “facade”, forcing users to authenticate through one of the following methods:
- An Apache style htpasswd file
- The Local Auth plugin to authenticate users locally with a nice management GUI if you think htpasswd is too “rough” and/or need to associate roles to local users.
- Enterprise SSO plugins: OpenID, SAML, LDAP*
- And a lot more: SQL DB, JWT token, … The complete list is documented here
Using the Apache style authentication middleware, it looks like this:
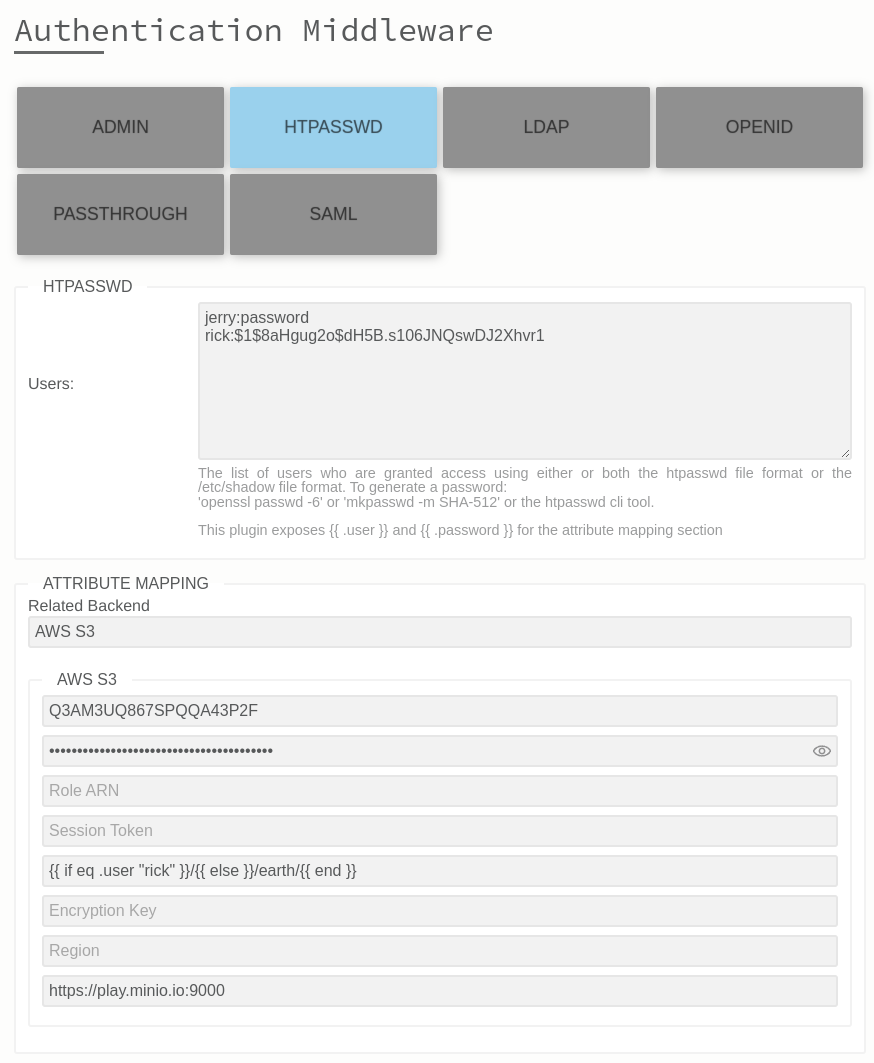
In this setup, we have 2 valid users, each with their own username and password. The path variable is dynamically generated based on the authenticated user. Concretely, this means the user “rick” has full access to all S3 buckets, while “jerry” is restricted to the “earth” bucket only.
Under the hood, these mappings are handled using the Go templating language, enhanced with custom functions to support more advanced use cases. For example, you can dynamically generate chroot paths based on AD groups by building queries like this: {{ if .memberOf | contains “ADMIN”}}/{{ else }}/{{ .department }}/{{ end }}
From identity to attributes
If you open the cover and look at the interface every authentication plugin implements, you will see they all output a list of attributes. Here’s how it flows: the attributes go through the template mechanism of the attribute mapping section, which compiles them into the user’s session data. That session data is the connection details of the underlying storage the user will land on, and those same attributes can also be used to restrict what the user is allowed to do on the storage through authorisation.
Which attributes you get depends on the plugin in use and how you configure it. Each plugin documents those in its description field where you configure the authentication middleware in use, and to see the actual values coming out, set the log level to DEBUG and log in (most plugins will print every attribute they return).
A few concrete examples:
- With the passthrough plugin set to the
username_and_passwordstrategy, the attributes are simply what the user typed in:{{ .user }}and{{ .password }}. - With the URL plugin, the URL parameters become the attributes.
- With OIDC, the list of attributes depends on the scopes you request and how your IDP is configured.
- With the SQL plugin, you control the attributes through the SQL query that runs the authentication, and every column becomes an attribute. For example:
SELECT username, password_hash AS password, role FROM users WHERE username = ?gives you
{{ .username }}and{{ .role }}, while thepasswordcolumn holds some kind of hashed password Filestash verifies the login against.
Pro tip 1: you have a couple of extra attributes available to you: every environment variable, prefixed with ENV_ (handy for secrets you don’t want sitting in the config, like {{ .ENV_AZURE_ACCOUNT_KEY }}), and {{ .machine_id }}.
Pro tip 2: the attributes you receive don’t have to be a 1 to 1 mapping. For example, if you get a JWT containing your session data, you can extract it using {{ .token | jwt "my_key" | jq ".sub" }}. There are tons of functions available to cover all the main use cases.
Advanced features
Direct File Links
A common use case is to create secure deep links to data in your storage, either generated by a backend somewhere as part of an integration, or distributed as QR codes. For example, this company maintains elevators: each elevator under their care has a QR code pointing to a storage space with all the documentation for that particular location.
Under the hood, those use cases are covered by either the passthrough plugin or the URL plugin, which builds a list of attributes from the URL it receives. To prevent unauthorised access, those URLs either carry a signature generated by a server with a shared key, or come with a JWT whose key gets verified through the templating rules, like this:
{{ .token | jwt "my_key" | jq ".sub" }}
Partner Accounts
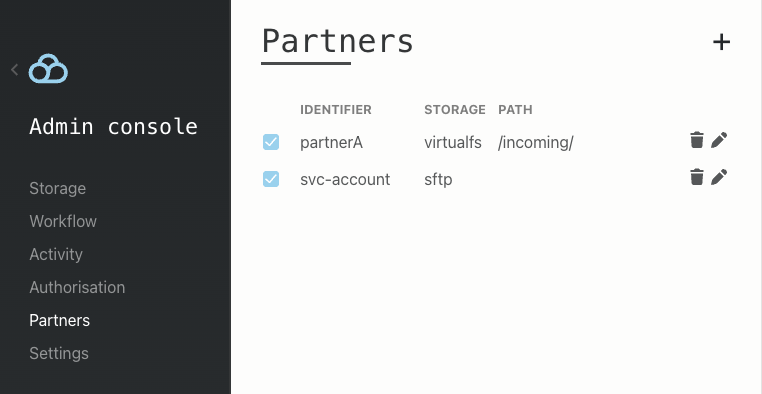
When you access data through the gateways and / or the API, it’s handy to have a path for partners or other machines to connect as well, especially if you are running tasks like managed file transfer. For those use cases, we have a dedicated plugin that lets partners and machines connect without having to add them to your IDP:
Custom Plugin
If none of the many existing authentication plugins fit your specific use case, you can write your own, either from scratch by implementing the same interface all the options above are built upon, or by extending one of the existing plugins. It can be a compiled plugin or a runtime plugin, and the cookbook has an example of exactly this.
A good illustration of this is the custom plugin we made for MIT that adds a second verification layer on top of the existing LDAP plugin, to perform 2FA via the Duo API. Because it extends the baseline LDAP plugin, we never even had to import anything LDAP related: all it adds is the 2FA step.
What next?
This guide was about 1 of the 3 pillars. Read about the other 2: storage and authorisation.